Showing posts with label foodie. Show all posts

Friday, August 24, 2012

Smorgasburg: A Foodie's Dream

Smorgasburg combines two of my favorite things - flea markets and food. It's basically an outdoor food flea market that takes place each Saturday through November in Williamsburg, Brooklyn. From 11am to 6pm, approximately 100 food vendors gather and sell their products. I've been twice now, and I highly recommend it if you're ever up here. Williamsburg is extremely easy to get to from Manhattan, but it's shocking how different it is from the hustle and bustle of the city.  It's a much slower pace and a lot less crowded - there aren't even walk signs at intersections! It's a very cute, artsy neighborhood - kinda reminds me of downtown Asheville, NC.

Back to Smorgasburg. Sorry.

I went alone the first time I went to Smorgasburg, not knowing exactly what to expect. I still thoroughly enjoyed myself, but I wished I had come with someone so we could try out more food. Some of the portions being sold were small enough where I could try a few different things, but some of them are quite large.

My sister and my best friend Emily visited me two weekends ago and we headed to Smorgasburg on Saturday morning. I wanted to them to see some of the other boroughs besides Manhattan while they were here, and I also enjoyed getting to try more food between the three of us. Here are a few of the things I've tried over my two trips....
This place specializes in hand made pigs in a blanket - such a fun and unique idea

Oh my goodness. This donut was from a bakery called Dough in Bed Stuy, Brooklyn. It was incredible. New York knows how to do donuts. 

Frozen mini smores
Brisket sandwich from Mighty Quinn's. Very moist, juicy and full of flavor. The line for Mighty Quinn's booth is consistently the longest line, so you know it's good. 

Southern Fried Chicken Taco. I had to try it as soon as I saw the words "southern fried chicken." Southern food/comfort food is very trendy up here. The taco was actually really good. NY does tacos a little different than the tacos I'm used to. They're usually made with a variety of different meats (shrimp, tilapia, carnitas, chicken, etc.), fresh lettuce, cotija cheese, cilantro sprigs, picked onions and are usually free from grease. Delicious.

Hope this has given you a taste of Smorgasburg (pun intended). Like I said, I highly recommend it and it's also something that's unique and not super touristy. 

When you go, you'll also get to enjoy these views while you're there...

Very cloudy on my first visit

So beautiful. 


Sunday, January 15, 2012

Cake Decorating 101

You volunteered to bring a cake to a party. You have no idea how to decorate. No worries, I've got you covered. Relax. You don't have to go buy a Wilton decorating kit or scour the internet for ideas. 

The easiest decorations are non-edible. It's alright if you have to take them off before you cut the cake. No one cares what the cake looks like after it's cut. Fresh flowers are a great way to top off a cake. This past Christmas, I decorated a cake with ornaments. Andrew's graduation was a few days before Christmas, so I combined Christmas and Clemson with these decorations. 
I had to make the cake two days in advance, so it worked out really well to pile these ornaments on top of the cake. Instead of stacking the ornaments and hoping they wouldn't roll off, I used a hot glue gun to make them stick together. The topper was also really easy to transport and move since it was all in one piece. 

Ribbons are also a great way to decorate. Just wrap a thick ribbon around the circumference of the cake, put some fresh flowers on top and everyone will be talking about your cake. 

Saturday, January 7, 2012

"At the Chef's Table" Tour

I found out about "At the Chef's Table" Tour this past August after my boss posted about how good it was on Facebook and Twitter. The tour is lead by local author and historian John Nolan. John teamed up with the Table 301 restaurant hub and together they have come up with a tour that gives participants the chance to dine at five different restaurants over the span of a few hours.

After reading about it online, I knew it would be the perfect birthday present for Andrew. Unfortunately, his birthday is in December so I had to wait four long months to give it to him. We finally got to go on the tour today and loved it. At each of the five stops, one of the chefs came out and talked to our group and told us how the dishes were prepared. With the exception of Nose Dive, all of the restaurants were closed during the tour, so we had the whole restaurant to ourselves. Here's a little recap of the places we went and what we ate. 

We started out at Soby's on the Side, where we sampled several items from their catering menu. Here's what's on the plate starting with the metal cup and going clockwise: Passion fruit creme brulee, open face Reuben with slaw, BLT with candied bacon and sun-dried tomatoes, toast with brie and lingenberry jam, and portabella mushroom with curry chicken and arugula.

Our next stop was Nose Dive, where we were taken to the upstairs loft. We ate Minuto soup, which is somewhat similar to chili, but it's main ingredient is tripe. I found out tripe comes from the lining of a cow stomach. So that was...neat to find out. This was actually my least favorite stop, but not because I don't like Nose Dive. The soup was just way too spicy for me, but I think the restaurant is great. 

Soby's was next on the list where we were offered two different drinks along with an entree. The drink on the left is made from muddled strawberries, mint leaves and club soda. The drink on the right is a fig bourbon mixed with lemon juice and club soda. 

This is the snapper we had at Soby's. It was served over hummus, chick peas, kale and cauliflower. 

We headed over to Devereaux's and tried some grouper served with carrots, polenta and mushrooms. 

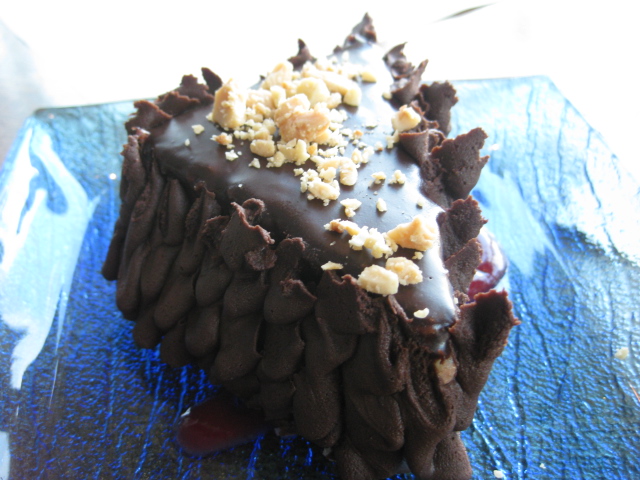
We finished the tour at the The Lazy Goat with some champagne and this lovely cake. It doesn't look like it in the picture, but it was a huge piece of cake. The pastry chef made a vanilla cake with a hazelnut filling. The cake was covered in chocolate ganache and topped with toasted almonds.

I would highly recommend this tour to anyone who loves food or Greenville. Between stops, John would tell us about the history of Greenville. I found out some interesting things about some buildings downtown, and he also showed us old pictures of downtown Greenville. It was neat to be standing somewhere along Main Street and then see a picture of how it looked in the same spot a hundred years ago. 

I also really enjoyed being able to meet the chefs and hear about what goes on in the restaurants every day. Our tour group had 24 people in, but I think our tour was larger because they didn't have any tours during December due to holiday parties. The minimum people the tour needs is 6. 

If you decide to go on a tour, you may not eat what we ate today. There is no set menu, though the restaurants typically serve one of their famous dishes. Both Soby's and Devereaux's served some type of seafood today, but it wasn't planned that way. The cake we had at Lazy Goat wasn't even on the menu, it was just something the pastry chef was experimenting with. I would love to do the tour again and taste more menu items. The tour would be a great gift or creative date night to any foodies. 

Wednesday, December 7, 2011

Cranberry Salsa Cream Cheese Dip

I came across this recipe on Pinterest a while back and was waiting for the right occasion to make it. I originally planned to make it as an appetizer for Thanksgiving, but ended up making it for a football game a fews days after. It was a huge hit and super easy to make.

It only takes about 15-20 minutes to put together and then is supposed to sit in the fridge for four hours. However, I didn't read that part until I had already made the salsa and kick-off was 2 hours away. It only sat in the fridge for about 2 hours and was perfectly fine. I also only used one package of cream cheese for the base layer and took the jalapeno seeds out since I'm not a  huge fan of spicy food. The recipe comes from a blog called Jamie Cooks It Up! Definitely will be making this for some holiday parties.

Cranberry Salsa Cream Cheese Dip
1  12 oz package fresh cranberries
1/4 C green onion, chopped
1/4 C cilantro, chopped
1 small jalapeno pepper
1 1/4 C sugar
1/4 t cumin
2 T lemon juice
dash salt
2  8 oz packages cream cheese
  
1. Put your cranberries in a food processor. 
2. Chop up your green onion, cilantro, and jalapeno pepper into small pieces. Take the seeds out if you don't like spicy foods. Also, be sure to put on a pair of rubber gloves or something when taking them out. 
3. Add all ingredients (but the cream cheese and the wheat thins) into a bowl. Mix them all together, cover and store in the fridge for at least 4 hours. The sugar needs some time to soak in to the cranberries and break up their bitter taste.   
4. When you are ready to serve, place your cream cheese bricks on a plate.
5. Spread the cream cheese out as evenly as you can.
6. Pour your cranberry mixture over the cream cheese.
7. Spread it all around.
8. Serve immediately with Wheat Thins, Ritz Crackers or Tortilla Chips.


Sunday, November 27, 2011

Sweet Potato Cake with Maple Cream Cheese Frosting

Hope you all had a great Thanksgiving! As if you haven't heard enough about food the past few days, I thought I would share a recipe I made for one of the Thanksgiving dinners I ate. I wanted to make a dessert that was somewhat seasonal, but I just wasn't feeling the typical pumpkin pie. After searching Pinterest for some inspiration, I came across a Martha Stewart recipe for Sweet Potato Cake. The recipe recommends a whipped white chocolate frosting, but I decided to modify my cream cheese icing recipe to make a maple cream cheese recipe. Everything was delicious. The cake was very moist and tastes similar to carrot cake or a spice cake, and the maple frosting complemented it nicely. I followed the cake recipe for the most part, except I left out the macadamia nuts completely and only made the cake a 2 layer cake instead of a 4 layer cake.

Ingredients

2 pounds (about 3) sweet potatoes
1 1/4 cups vegetable oil
Unsalted butter, for pans
2 cups cake flour, (not self-rising), plus more for pans
4 large eggs
2 cups sugar
2 teaspoons baking powder
1 teaspoon salt
1 tablespoon ground cinnamon
1 teaspoon ground nutmeg
2 teaspoons pure vanilla extract
3 tablespoons brandy
1 1/2 cups unsalted macadamia nuts, toasted, coarsely chopped

Directions
1. Heat oven to 400 degrees. Coat potatoes with 1/4 cup vegetable oil, and place on baking sheet. Bake until tender, 30 to 40 minutes. When cool enough to handle, remove skin, and mash flesh with a fork into coarse puree.

2. Lower oven temperature to 325 degrees. Butter two 8-by-1 1/2-inch round cake pans, dust with flour, and set aside. In the bowl of an electric mixer fitted with the paddle attachment, beat eggs and sugar together on medium-high speed until light and fluffy, about 5 minutes. Add remaining 1 cup vegetable oil; beat on medium speed until well combined. Add the cooled sweet potatoes; mix until combined.

3. Sift together cake flour, baking powder, salt, cinnamon, and nutmeg; mix into sweet potato mixture. Mix in vanilla and brandy until combined. Remove batter from mixer; fold in 1 cup macadamia nuts by hand.

4. Evenly distribute cake batter into prepared pans, and transfer to the oven. Bake until a toothpick inserted into center comes out clean, 40 to 45 minutes. Let pans cool on a wire rack 10 minutes. Invert cakes onto rack; cool completely, about 1 1/4 hours.

5. Cut each cake layer in half horizontally, creating four layers. Spread 2/3 cup chocolate frosting on one layer, then stack next layer on top, and frost. Repeat frosting-and-stacking process until each layer is frosted. Spread remaining frosting on sides and top of cake. Arrange remaining 1/2 cup macadamia nuts on top of cake, and serve.

Here's a picture of mine.

Thursday, November 17, 2011

Chocolate Caramel Cupcakes

Whenever I volunteer to bake something for a party/get-together/birthday, I always have so many recipes I could make. However, for some reason I always feel the need to try a new recipe instead of making something I've made before. I usually end up wasting an hour browsing the internet before I choose something to make.

Last week was no different. I volunteered to make a dessert for my small group get together. I could have made my tried and true chocolate cupcakes, but of course I wanted to try some new chocolate cupcakes. I found these Heath Bar Cupcakes from Your Cup of Cake and decided to try them.

Chocolate Buttercream Cake:
¾ cup buttermilk
½ cup oil
3 eggs
1 teaspoon vanilla extract
1 cup sour cream
Devil’s Food Cake Mix

Caramel Filling:
1/3 cup sweetened condensed milk
1/3 cup caramel (store bought or homemade)

Caramel Buttercream:
½ cup butter
8 oz cream cheese
2-4 tablespoons caramel
1 teaspoon vanilla extract
1-2 tablespoons milk
3-4 cups powdered sugar

Directions:
1. Preheat oven to 350 degrees and line 2 muffin tins with 24 cupcake liners.
2. Combine buttermilk, oil, eggs and vanilla.
3. Slowly mix in cake mix and add sour cream.
4. Fill liners ¾ full and bake for 18-22 minutes or until an inserted knife comes out clean.
5. Caramel Filling: Whisk sweetened condensed milk and caramel together.  Pour into a squeeze bottle if one is available and insert tip into each warm cupcake fill as desired.  If you do not have a squeeze bottle, hollow out a little circle at the top of each cupcake and spoon the mixture into it.
*My caramel mixture was pretty thin and the cupcake soaked it up. I added the cake I spooned out back into the cupcake so I didn't have a big hole.
6. Buttercream: Beat butter and cream cheese until light and fluffy.  Add caramel, vanilla and powdered sugar.  Then adjust consistency using milk and powdered sugar.  Beat well.
7. Pipe onto cooled cupcakes and top with melted chocolate and a piece of a Heath Bar.

I didn't add the Heath Bar on top and instead just drizzled caramel. The picture on the blog I got the recipe from is beautiful and had really stiff icing. The icing I made wasn't stiff at all. It didn't hold my swirl when I piped in on the cupcake. I should have used my go-to cream cheese icing and just added a little caramel. However, the cake was pretty good. Not quite as rich or dense as my regular chocolate cupcake recipe, but it was really moist because of the caramel filling. I would make the cupcake recipe again, but definitely not the icing.

Here is a picture of my cupcake. You can see how the icing just kinda spread out over the cake.

Saturday, November 12, 2011

Pumpkin Apple Pie

Ok so I cheated on the "21 Day No Junk Food Challenge." I just got a terrible baking itch last week. There was nothing I could do to get rid of it. I had to bake. After seeing all the pies at The Cafe at Williams Hardware, I knew I had to make one. I was in the mood for something pumpkin, but I also kinda wanted to make an apple pie. After searching a few recipes online, I decided to type in "Pumpkin Apple Pie." Several great-looking recipes popped up right away. My decision was made.

I found the original recipe at TasteofHome.com. I ended up changing a little bit from the original. Here is what I used.

Ingredients
1 sheet refrigerated pie pastry
2 cups thinly sliced peeled tart apples.
1/4 cup sugar
2 teaspoons all-purpose flour
1 teaspoon lemon juice
1/4 teaspoon ground cinnamon

PUMPKIN FILLING:
1-1/2 cups canned pumpkin
1 cup evaporated milk
2 eggs
1/2 cup sugar
3/4 teaspoon ground cinnamon
1/4 teaspoon salt
1/8 teaspoon ground nutmeg

TOPPING:
1/2 cup all-purpose flour
4 tablespoons sugar
4 tablespoons brown sugar
6 teaspoons cold butter

Directions
On a lightly floured surface, unroll pastry. Transfer pastry to a 9-in. deep-dish pie plate. Trim pastry to 1/2 in. beyond edge of plate; flute edges. In a large bowl, combine the apples, sugar, flour, lemon juice and cinnamon. Spoon into crust.

In another large bowl, whisk the pumpkin filling ingredients. Pour over apple mixture. Bake at 375° for 30 minutes.

For topping, combine flour and sugar. Cut in butter until crumbly; stir in walnuts. Sprinkle over pie.
Bake 25-30 minutes longer or until a knife inserted into pumpkin layer comes out clean (cover edges with foil during the last 15 minutes to prevent overbrowning).

This pie was super yummy! The perfect fall treat. I would definitely make this again.

Monday, November 7, 2011

Swamp Rabbit Trail

One of my favorite memories in college was a day trip I took with my roommates during my sophomore year. We road tripped to Damascus, VA one Saturday and rode the Virginia Creeper Trail, which is a 34 mile bike trail that follows the path of a former railroad. We only did half the trail, which actually isn't very hard at all. The trail is downward sloping the majority of the time, and the beautiful scenery provides great opportunities to stop and take pictures . Here are a a few pictures from that trip.


We tried to plan a trip this year, but it didn't work out where we all had an entire Saturday in the fall that we could dedicate to a road trip. However, we did make it up to Greenville this past Saturday to ride the Swamp Rabbit Trail. We rented some bikes in downtown Greenville and were on our way. We had a lot of fun, but it sure was cold and windy! Here are a few pictures from our trip.


We loved the bikes we rented! They were so cute and vintage looking - made me want to start biking a lot more so I can have an excuse to buy one :) The top two pictures are pictures with my roommates Lindsay and Rachel. The last picture is of my roommate Stephanie. She was struggling (i.e. she was exhausted after a mile and a half of our 12 mile ride). She was being very dramatic at the time and decided to lay down to rest. For those of you that know her, you might be laughing at this. For those of you who don't, just know she is one of those people who is impossible to truly describe and is unlike anyone else you will ever meet. We love her. 

We ended our ride by stopping at The Cafe at Williams Hardware on our way back to Clemson. I have been wanting to try this family-owned restaurant ever since I visited it this summer for a project I was working on for my internship. I had the grilled ham and gourmet pimento cheese sandwich with a side of tomato okra soup. It was so good and hit the spot after our cold morning ride. Everyone else was happy with their food too. Definitely recommend it if you're ever in the grand town of Travelers Rest, SC. They also had an impressive selection of desserts. I was so tempted to try one. But I didn't. 

Remember? I'm on the 21 day no junk food challenge.

While I promise I didn't get any dessert at lunch, looking at the desserts may or may not have started an irresistible baking itch deep inside of my soul. I may or may not have a recipe to share with you later this week....


Sunday, October 16, 2011

Last Minute Peanut Butter Pie

Here's the story behind this pie. A few weeks ago, I was planning to go to Andrew's apartment to eat dinner. He and his roommates were having "hibachi night," which is basically where they try to recreate a Japanese steakhouse in their kitchen. Around 3:30 on Monday afternoon I get this phone call from Andrew. After finishing up some small talk, he ends the conversation with this...

 "So just come over around 6 for dinner. Oh yeah, do you think you could bring a dessert?"

 "Well, it's 3:30 and I still have to go to a meeting with a teacher and was hoping to go to cycling class at 5...what exactly did you have in mind, and why am i just now hearing about this?"

"I don't know...maybe a cake or some cupcakes?"

"There is no way you're getting a cake or cupcakes. Those take a lot of time to make."

"It's ok Laura. You'll figure out something. I know you won't let us down. See you at 6!"

I was shaking my head as I hung up the phone. The easy thing to do would be to pick up a frozen pie at the grocery store. But I couldn't. My pride wouldn't let me. My friends know me as the one who bakes yummy desserts. I couldn't bring anything frozen. While I waited for my meeting with my teacher to start, I found a recipe and made my grocery list. I swung by the grocery store on the way home and got started on a Peanut Butter Pie. I got the recipe for the filling from this blog, and then modified it a little.

Peanut Butter Pie
1 chocolate cookie pie crust (I bought mine pre-made from the store, but you could make your own if you have time - I didn't)
1 cup chocolate chips
1 bag of Reese's Peanut Butter Cups

1 cup heavy cream
8 ounces cream cheese
1 cup creamy-style peanut butter
1 cup confectioner's sugar
1 – 14 ounce can sweetened condensed milk
1 teaspoon vanilla extract

Melt the chocolate chips and pour over bottom of the cookie crust. Unwrap Reese's Peanut Butter Cups and put on top of melted chocolate. You can cover the whole pie with these or just use a few. You can chop them into smaller pieces and sprinkle them on top of the chocolate or leave them whole. I left them whole to save time, but I might cut them into smaller pieces next time. Put pie crust into the refrigerator while you make the filling.

Pour the heavy cream into a bowl and beat using a stand mixer or hand mixer until stiff peaks form.  Transfer to a small bowl and store in refrigerator until ready to use.  Place the cream cheese and peanut butter in a deep bowl (I used the same bowl I used for the whipped cream-didn't even clean it).  Beat on medium speed until light and fluffy.  Reduce speed to low and gradually beat in the confectioner's sugar.  Add the sweetened condensed milk and vanilla extract. Increase speed to medium and beat until all the ingredients are combined and filling is smooth.

Stir in 1/3 of the whipped cream into the filling mixture (helps lighten the batter, making it easier to fold in the remaining whipped cream).  Fold in the remaining whipped cream.  Pour the filling into the prepared crust.  If you want, drizzle the more melted chocolate on top or sprinkle some more Reese's on top. Refrigerate for three hours or overnight before serving. Obviously, I didn't have time to refrigerate it that long, so I stuck it in the freezer for an hour while I went and worked out before dinner.

The pie was a hit. The boys loved it. Perfect for a last minute dessert and so delicious.

Here's a picture. It's not a good one, but I still wanted to show you.

Monday, October 10, 2011

You Win Some, You Lose Some

I've been getting a lot of recipes from Pinterest lately, which usually trace back to a recipe on a blog. Here's the thing with blog recipes - you don't always know if it is going to be good. While it may look amazing in the beautiful pictures posted on the blog (sorry, you don't get beautiful pictures on my blog), it doesn't always taste amazing. I try to sift through some of the comments on the blog post for any hints as to whether the recipe is good or not, but most people post things along the lines of "this looks amazing!" or "I can't wait to make this!" Those comments don't help me out very much. I've learned that sometimes you just have to take a chance and test the recipe out, not knowing how it's going to turn out.

I realize there's always a chance a recipe isn't good, regardless of the source, but I am more trusting when using a cookbook because I know the recipe has probably been tested multiple times. It has also been published.

Last week I saw a beautiful homemade pumpkin spice latte (PSL) picture pinned on Pinterest. Sure enough, the recipe was linked to a blog. I decided to take a chance and try it out. It wasn't very good and wasn't even close to tasting like a Starbucks' PSL.

 But I did try to take some pretty pictures...
I know, it's not the prettiest picture, but I tried. I should have piled the whipped cream higher. 

Later on the week, I decided to try a recipe a friend has posted on her blog. She had found the recipe online, tweaked it a little and had good things to say about it. I made it not once, but twice last week because it was so good. It doesn't taste exactly like Starbucks, but it's still delicious. Here's the recipe...

Pumpkin Spice Latte
makes 1-2 servings (more like 2)
Ingredients:
2 cups milk
4 tablespoons canned pumpkin (recipe calls for 2, but it needs more)
1-2 tablespoons sugar or sugar substitute (I put 3 Splenda)
2 tablespoons vanilla extract (not a mistake)
3/4 teaspoon pumpkin pie spice
1/2 cup strong brewed coffee or 1-2 shots of espresso

In a saucepan combine milk, pumpkin, and sugar on medium heat and stir until steaming. Remove from heat and stir in vanilla and pumpkin spice. Transfer to blender and process until foamy (15-20 seconds).

Pour into 2 large mugs and top with whipped cream. Sprinkle with pumpkin pie spice, cinnamon, or nutmeg. 

PS- I will try to give you my honest opinion on recipes I post. Some of the stuff doesn't always turn out great, and I will tell you that! No reason for you to make something that isn't good. 

Sunday, October 2, 2011

Fall, Food and Football

Those three words sum up my weekend. This cooler, crisp weather has been amazing! Also, my awesome roommate snatched the last two cans of pumpkin from the shelves of Wal-Mart for me. The best part about that is that I didn't even have to go to Wal-Mart! While Wal-Mart may have had pumpkin all along, I try to avoid going there at all costs. Yes, Wal-Mart is a great way to save money, but I also have to prepare mentally each time I go there and pray for an extra dose of patience in the morning. Especially at Christmastime.

Back to the current season. On Friday, I celebrated fall by going apple picking at Sky Top Orchard. Here's a few pictures from our afternoon...
This is me giving Andrew the usual "can we please just get one normal picture?" speech. He doesn't look too concerned. Notice there are not any other pictures of us on this post. That's because we never got a normal picture. 

My and one of my roomies

Yummy!

While I haven't made any apple recipes yet, I did make some delicious pumpkin cupcakes that I saw on this lovely blog. Here is the recipe...

Pumpkin Spice Cake
1 Package Yellow Cake Mix ( I use Pillsbury Moist Supreme Classic Yellow)
1/2 c. Granulated Sugar
1/2 c. vegetable oil
1 can pumpkin (15 oz. pure pumpkin–we like Libby’s brand)
1/4 cup water
1 tsp vanilla
2 teaspoons ground cinnamon
4 eggs
1 tsp pumpkin pie spice

Combine all ingredients in bowl and beat until well blended. Bake at 325 for 23-24 minutes or until cupcakes spring back to touch. Frost with your favorite cream cheese icing. 

These cupcakes were so moist and easy to make. I modified my cream cheese icing recipe from this post for the frosting. I honestly don't know how much I added, but I put a little canned pumpkin, pumpkin pie spice and cinnamon until I was satisfied with the taste and consistency. Here are a few pictures of them...


I definitely recommend trying this recipe if you are craving some fall food!

Saturday night I watched those Clemson Tigers win again! So proud of them!


Monday, September 12, 2011

Almond Cream Cheese Pound Cake

I have another easy, delicious recipe for you today. This recipe comes from a book called "The Cake Mix Doctor" by Anne Byrn. Anne is the cake mix queen. All of her delicious recipes are easy and have a cake mix base, but no one eating the cake would ever be able to guess that. If you've committed to making yet another treat for a birthday, holiday, class party or any other celebration and need something delicious, easy and fast, I strongly recommend buying any of her cookbooks.

Almond Cream Cheese Pound Cake

Ingredients:
1 (18 oz) box of "Butter Golden" cake mix (I use Duncan Hines)
1 (8 oz) package of cream cheese, at room temp
4 eggs
1/2 cup sugar
1/2 cup water
1/2 cup vegetable oil
1 teaspoon almond extract
1 teaspoon pure vanilla extract

Place all ingredients in large mixing bowl. Mix with an electric mixer on low for one minute until all combined. Mix at medium for two minutes. Batter should look uniform and thick. Back in greased and floured 10 in tube pan* at 350 for about 45 minutes. Cake should spring back when touched.

*I have never used a tube pan. Use the pan appropriate for what size cake you want to make. I have always used 2 9 inch round cake pans.

I usually frost this cake with Wilton's buttercream icing recipe, but the cake is rich enough that you could frost it with a glaze instead. If you don't have a huge sweet tooth, you could just serve this cake with berries and whipped cream. I have always iced it and made a strawberry or raspberry cream cheese filling to go in between the layers.

Here are some different ways I have decorated this cake. I made it for one of my roommates birthday last year, and she requested it again this year. I also made it for one of my friend's family when they moved to good ole South Carolina. They still talk about the cake to this day.


Friday, September 2, 2011

Thick, Huge and Chewy Chocolate Chip Cookies

I've decided to share my favorite chocolate chip cookie recipe with you. It's not exactly a secret recipe, but it is really good. I highly recommend you make it - you won't be sorry :) They seriously look like cookies that are for display only. They are so big and round and chewy.

This recipe is from CookIllustrated.com. You will notice that the recipe also lists the ingredient amouts in ounces. If you aren't comfortable using a scale like this one, it's fine, just measure out your ingredients like you normally would. I personally like using a scale. I just stick a bowl on it and weigh my ingredients. No packing brown sugar or forgetting how many cups of flour I put it. Also, I weigh my cookies so they are all the same size. You might be rolling your eyes right now, but my cookies sure do come out pretty and uniform :)


Also, make sure you read the entire recipe and make sure you have all the ingredients before you start. Andrew made me lunch one day this week, and apparently he doesn't think it's important to read the entire recipe before you go to the store. For this reason, he ended up substituting Propel for chicken broth in the soup he made. Still not sure why he thought Propel was a good choice. At least he tried :) Anyways, back to the recipe...

INGREDIENTS

  • 2 1/8cups bleached all-purpose flour (about 10 1/2 ounces)
  • 1/2teaspoon table salt
  • 1/2teaspoon baking soda
  • 12tablespoons unsalted butter (1 1/2 sticks), melted and cooled slightly
  • 1cup brown sugar (light or dark), 7 ounces
  • 1/2cup granulated sugar (3 1/2 ounces)
  • 1large egg
  • 1large egg yolk
  • 2teaspoons vanilla extract
  • 1 - 2cups chocolate chips or chunks (semi or bittersweet)

INSTRUCTIONS

  1. 1. Heat oven to 325 degrees. Adjust oven racks to upper- and lower-middle positions. Mix flour, salt, and baking soda together in medium bowl; set aside.
  2. 2. Either by hand or with electric mixer, mix butter and sugars until thoroughly blended. Mix in egg, yolk, and vanilla. Add dry ingredients; mix until just combined. Stir in chips.

    3. Form a ball with about 1/4 of dough. These are supposed to be big. If you are weighing them, I usually make sure each ball is 2.2 oz. You don't want the edges to be smooth. This is not your typical smooth, round ball of dough. Jagged edges = cool texture when the cookie cooks. To make a jagged edge, split your ball of dough in half and rotate the halves so the rough, pulled apart side of the dough is on the outside. Then put your dough back together. 

    4. Place formed dough onto one of two parchment paper-lined 20-by-14-inch lipless cookie sheets, about nine dough balls per sheet. 
    * You don't have to use 20-by-14-inch lipless cookie sheets. Regular cookie sheets work fine, you just might not be able to cook as many cookies at once. These spread out a lot so give them plenty of room. 

    5.  Bake, reversing cookie sheets’ positions halfway through baking, until cookies are light golden brown and outer edges start to harden yet centers are still soft and puffy, 15 to 18 minutes (start checking at 13 minutes). I have found that 17 minutes works for my oven, rotating them at 8 and a half minutes.