Monday, September 26, 2011

Falling for Fall

Fall is here! Fall is my favorite season of the year. I love the leaves, the cool weather, fall clothes, fall recipes, bonfires and football games. I should probably also mention my birthday is in fall :) I am so ready for everything fall, but have been a little disappointed with fall so far. It's time for the SC humidity and warm temperatures to go. We have had quite a few rainy, yucky mornings here, and I like to sip my coffee inside and pretend that it 's cold outside. Of course, I am hit with reality once I open my front door. A girl can dream, right?

Another major disappointment has been the lack of pumpkin products at my grocery store. I have scoured the aisles looking for pumpkin pie filling during my last two shopping trips. They don't have it yet! I left the store disappointed today, my cart full of all the other ingredients for pumpkin pie cupcakes. I have two events this weekend I was hoping to make pumpkin cupcakes for, so I am crossing my fingers that they will get pumpkin pie filling later this week.

Even though the weather has been hot and I haven't been able to find my ingredients, I still have high hopes for fall. I know it won't let me down. Sometimes summer likes to wear out its welcome before it lets fall take the stage. In the meantime, I will prepare for its grand appearance by finding lots of fall things on Pinterest :) Here are the cupcakes I am planning to make...
I will be sure to let you know how they turn out!

Thursday, September 15, 2011

A Royal Affair

We had a very special princess party at my house a few weeks ago. My family's little foster girl turned 7. She is extremely girly and loves everything pink, sparkly or princess. She had been counting down the days to her birthday since March, and she wanted to plan her princess party all summer long. Here's a glance at the party decorations...
The food table

We used wands for the fruit kabobs

More wands in the flower arrangements

Of course, we had to have a pink princess cake

Party favors for the guests

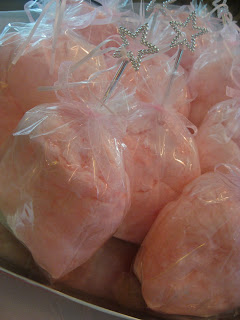
Cotton candy


Princess-themed sandwiches

As if we didn't already have enough sweets, we decided to make some pink lemonade cupcakes to go along with the pink theme. 

During the party, we did the girls' hair and makeup and gave them all tiaras to wear. Then we did a little fashion show and took pictures of everyone. It was a very girly and fun-filled day.


Monday, September 12, 2011

Almond Cream Cheese Pound Cake

I have another easy, delicious recipe for you today. This recipe comes from a book called "The Cake Mix Doctor" by Anne Byrn. Anne is the cake mix queen. All of her delicious recipes are easy and have a cake mix base, but no one eating the cake would ever be able to guess that. If you've committed to making yet another treat for a birthday, holiday, class party or any other celebration and need something delicious, easy and fast, I strongly recommend buying any of her cookbooks.

Almond Cream Cheese Pound Cake

Ingredients:
1 (18 oz) box of "Butter Golden" cake mix (I use Duncan Hines)
1 (8 oz) package of cream cheese, at room temp
4 eggs
1/2 cup sugar
1/2 cup water
1/2 cup vegetable oil
1 teaspoon almond extract
1 teaspoon pure vanilla extract

Place all ingredients in large mixing bowl. Mix with an electric mixer on low for one minute until all combined. Mix at medium for two minutes. Batter should look uniform and thick. Back in greased and floured 10 in tube pan* at 350 for about 45 minutes. Cake should spring back when touched.

*I have never used a tube pan. Use the pan appropriate for what size cake you want to make. I have always used 2 9 inch round cake pans.

I usually frost this cake with Wilton's buttercream icing recipe, but the cake is rich enough that you could frost it with a glaze instead. If you don't have a huge sweet tooth, you could just serve this cake with berries and whipped cream. I have always iced it and made a strawberry or raspberry cream cheese filling to go in between the layers.

Here are some different ways I have decorated this cake. I made it for one of my roommates birthday last year, and she requested it again this year. I also made it for one of my friend's family when they moved to good ole South Carolina. They still talk about the cake to this day.


Friday, September 2, 2011

Thick, Huge and Chewy Chocolate Chip Cookies

I've decided to share my favorite chocolate chip cookie recipe with you. It's not exactly a secret recipe, but it is really good. I highly recommend you make it - you won't be sorry :) They seriously look like cookies that are for display only. They are so big and round and chewy.

This recipe is from CookIllustrated.com. You will notice that the recipe also lists the ingredient amouts in ounces. If you aren't comfortable using a scale like this one, it's fine, just measure out your ingredients like you normally would. I personally like using a scale. I just stick a bowl on it and weigh my ingredients. No packing brown sugar or forgetting how many cups of flour I put it. Also, I weigh my cookies so they are all the same size. You might be rolling your eyes right now, but my cookies sure do come out pretty and uniform :)


Also, make sure you read the entire recipe and make sure you have all the ingredients before you start. Andrew made me lunch one day this week, and apparently he doesn't think it's important to read the entire recipe before you go to the store. For this reason, he ended up substituting Propel for chicken broth in the soup he made. Still not sure why he thought Propel was a good choice. At least he tried :) Anyways, back to the recipe...

INGREDIENTS

  • 2 1/8cups bleached all-purpose flour (about 10 1/2 ounces)
  • 1/2teaspoon table salt
  • 1/2teaspoon baking soda
  • 12tablespoons unsalted butter (1 1/2 sticks), melted and cooled slightly
  • 1cup brown sugar (light or dark), 7 ounces
  • 1/2cup granulated sugar (3 1/2 ounces)
  • 1large egg
  • 1large egg yolk
  • 2teaspoons vanilla extract
  • 1 - 2cups chocolate chips or chunks (semi or bittersweet)

INSTRUCTIONS

  1. 1. Heat oven to 325 degrees. Adjust oven racks to upper- and lower-middle positions. Mix flour, salt, and baking soda together in medium bowl; set aside.
  2. 2. Either by hand or with electric mixer, mix butter and sugars until thoroughly blended. Mix in egg, yolk, and vanilla. Add dry ingredients; mix until just combined. Stir in chips.

    3. Form a ball with about 1/4 of dough. These are supposed to be big. If you are weighing them, I usually make sure each ball is 2.2 oz. You don't want the edges to be smooth. This is not your typical smooth, round ball of dough. Jagged edges = cool texture when the cookie cooks. To make a jagged edge, split your ball of dough in half and rotate the halves so the rough, pulled apart side of the dough is on the outside. Then put your dough back together. 

    4. Place formed dough onto one of two parchment paper-lined 20-by-14-inch lipless cookie sheets, about nine dough balls per sheet. 
    * You don't have to use 20-by-14-inch lipless cookie sheets. Regular cookie sheets work fine, you just might not be able to cook as many cookies at once. These spread out a lot so give them plenty of room. 

    5.  Bake, reversing cookie sheets’ positions halfway through baking, until cookies are light golden brown and outer edges start to harden yet centers are still soft and puffy, 15 to 18 minutes (start checking at 13 minutes). I have found that 17 minutes works for my oven, rotating them at 8 and a half minutes.